Dear Users,
To ensure the better performance of your e-bike, please read through the T319-R product introduction carefully before using it. We will use the brief words to inform you of all the details (including hardware installation, setting, and regular use of the display) when using our display. Meanwhile, the introduction will also help you solve possible confusion and barriers.
T319-R LED product is made of Black and White plastic (PC) materials, the working temperature scope of the housing material is -20℃—+60℃, and the shell material can ensure regular use and good mechanical performance of the products.
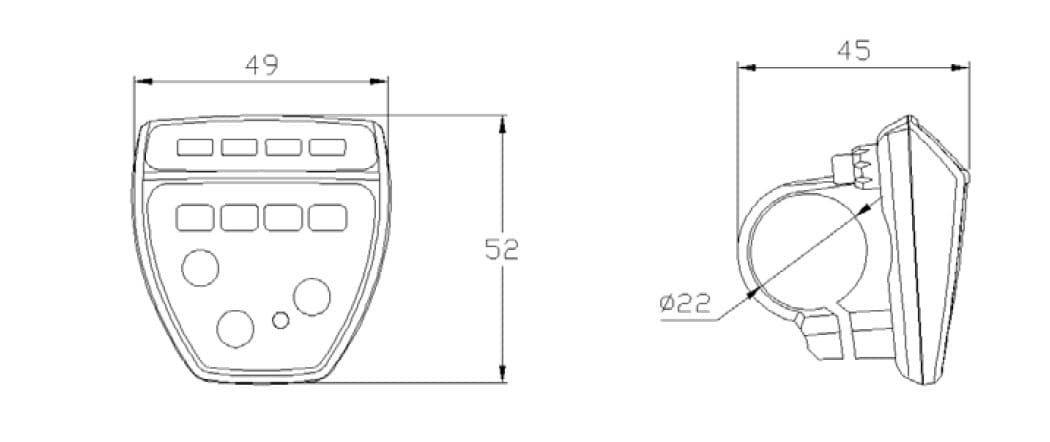
Display Dimensions (Unit: mm)
T319-R provides a variety of functions and displays to meet customers’ riding needs. Display the content list as follows:
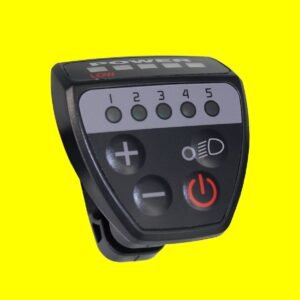
There are 3 buttons on the T319-R display, including the Power button, “+” and “-“. In the following introduction, the Power button is named “Switch”, “+” is named “UP”, and “-” is named “DOWN”.
Take care when using the display and do not connect/disconnect it while the power is on.
Fix the display onto the handlebar and adjust it to an appropriate visual angle when powering off the E-bike, plug the connector of the display with the connector corresponding to the controller to complete the installation.
Short press the “Switch” button then the display will power on, and the display will turn on the controller. In a power-on state, short press the “Switch” button to turn off the power supply of the e-bike. In the power-off state, the display no longer uses the battery power. The leakage current is less than 1 uA.
Note: If the E-bike has not been used for 10 minutes, the display will turn off automatically.
Scan the primary card in the start-up interface, turn off the power after the battery indicator flashing, and then turn it on again to enter the card matching interface.
After power on, the display prompt to match the primary card firstly, at this time, the fourth power light is always on, the third power light is flashing, and at this time, the scanning card is identified as the primary card; then prompt to matching the secondary card 1, at this time, the fourth power light is always on, the third and the second power lights are turned on and off, this cycle is repeated before completing the secondary card 1, at this time, the scanning card is identified as the secondary card 1; then prompt the secondary card 2. At this time, the fourth power light is always on, The remaining three power lights turn on and off from high to low, this cycle is repeated before completing the secondary card 2, at this time, the scanning card is identified as the secondary card 2. After all the three cards are matched, the power light will flash and then turn off. Start up again to enter the scanning card interface. At this time, the start-up cards have been updated to these 3 new cards.
When the display starts up normally, there will be a prompt card scanning interface. In this interface, the PAS level lights will light up from high to low in turn, turn off after all lights are on, and display circularly before the card scanning operation. At this time, scan the secondary card directly to enter the main interface; if scan the primary card, the power light will flash and the display will turn off, turn on the display again to enter the card matching interface.
Push and hold the “DOWN” button for 2 seconds to enter the model of the walking assistant. The e-bike will go on at speed of 6 Km/h, the PAS level lights will not turn on.
Note: The walk assist mode can only be used when the user is pushing the E-bike. Do not use it when riding.
Press and hold the “UP” button for 2 seconds to turn on the backlight of the display, and the controller will be informed to turn on the headlight. Long press the “UP” button again to turn off the backlight.
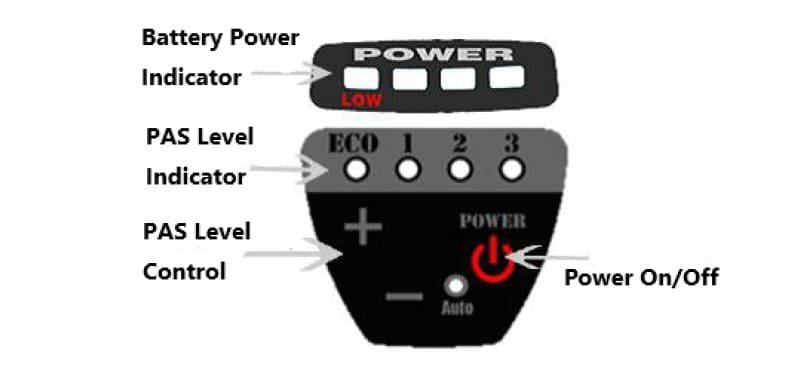
Short press the “UP” or “DOWN” button to switch the PAS level, the motor output power will be charged accordingly by the PAS level of the E-bike. The output power of the motor is 0-3 levels. Level 0 is the no output level, level 1 is the lowest output level, and level 3 is the highest output power level of the motor. The default start-up level is level 1.
When the battery is in high voltage, the four led battery power lights are all lit up, when the battery is in low voltage, the last battery power light will flash to notice that the battery needs to be recharged immediately.
When the E-bike electronic control system fails, the display will automatically flash the LED light to indicate the error code. Please see Appendix 1 for the definition of the detailed error code.
Note: Only after the fault is eliminated, the error code interface can be cleared, and the E-bike will not be able to ride when the error code occurs.
Q: Why can’t turn on the display?
A: Please check whether the battery is turned on or the leakage lead wire is broken
Q: How to deal with the error code display?
A: Contact the e-bike maintenance station in time.
I. Warranty Information:
II. The following are not covered by warranty:
The instruction manual of this display is the operation manual of the general software version 1.0. The version of the display software used on some vehicles may be slightly different from this manual, and the actual version used shall prevail.
| Error Code Display | Definition |
| PAS level light 1 flash | Current Abnormal |
| PAS level light 2 flash | Throttle Abnormal |
| PAS level light 1 & 2 flash | Motor phase problem |
| PAS level light 3 flash | Motor Hall defect |
| PAS level light 1 & 3 flash | Brake Abnormal |
| PAS level light all flash | Abnormal Communication |
| Battery power light & PAS level light all flash | Switch button sticky |
| Battery power light all flash | 6km function button sticky |
| All Battery power light & PAS level light flash alternately | Register error |